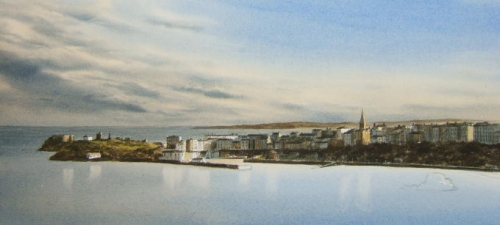
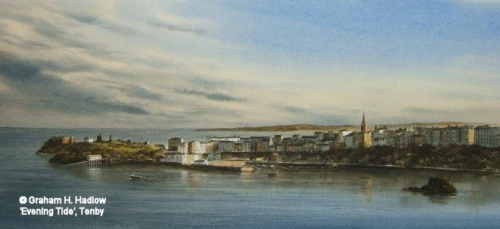
Stepped Demonstrations - Evening Tide, Tenby
1.
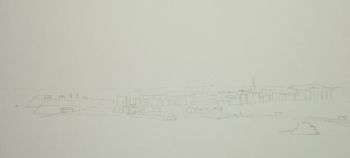
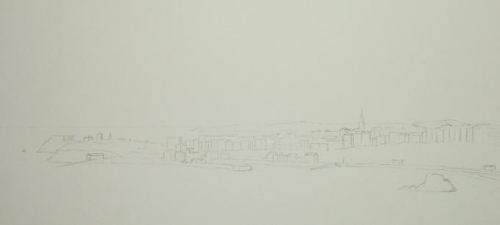
1. On a 20”x 9”sheet of thin cartridge paper draw the scene of Tenby. This will often require alterations and adjustments, which, if carried out on watercolour paper, would damage the surface.
2. When complete, turn the paper over and rub with a soft pencil. Place on a piece of stretched watercolour paper, secure with 4 pieces of masking tape and scribe over the image with a fine ball point pen. This will give a fine tracing without any need for corrections and the surface remains undisturbed. The stencil can be used again if the painting goes wrong and needs repeating. Sanity preserved!
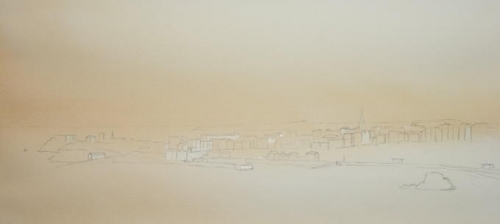
3. Mask out the sunlit buildings with clear masking fluid
applied with a fine pastel shaper.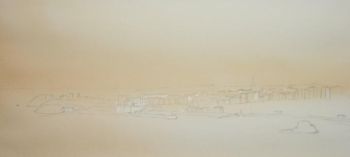
2.
1. Colours to be used are burnt sienna, raw sienna, cobalt blue and white gouache – Winsor & Newton Cotman.
2. Mix a wash of burnt sienna and a little raw sienna. Wet the entire surface and apply the wash with a hake brush denser around the horizon, getting gradually lighter towards the top and bottom. Allow to dry thoroughly.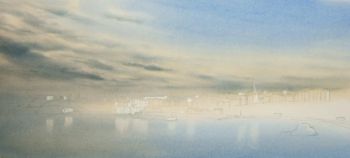
3.
1. Mix two soupy washes: one of cobalt blue and another of cobalt blue and a small amount of burnt sienna (a cool grey).
2. Wet the paper evenly with a soft goat hair brush. Paint the blue area with the cobalt using a ‘Frank Clark Baby Goat Brush’, and with the same brush apply the shadow area to the thin clouds using the other wash, being careful to leave the light areas on the sunlit edges. All this needs to be completed whilst the paper is still damp or hard edges will develop and ruin any depth in the painting.
3. The colours in the sky are reflected in the water with the lighter reflections of the buildings lifted out with a Winsor & Newton University Series ½” flat.
4. I do not lift out whole clouds with tissues as this promotes hard edges which are almost impossible to soften effectively.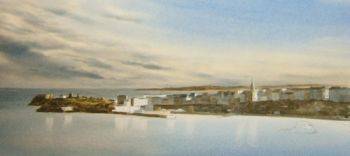
4.
1. Using the cloud shadow wash, paint the further sea area with horizontal strokes. Try not to get the horizon too hard edged and vary the tone throughout the length. A very hard horizon will not recede into the distance.
2. Paint the distant island using a combination of the three colours taking care not to make the edges too hard. The lightest tones should be at the top.
3. Remove all the masking fluid. Paint the colours of the buildings and allow them to dry before brushing in
the shadow areas making things look three dimensional. The shadow areas will vary in intensity depending on the colours and with such an area of complex detail it is going to take some time to complete
5.
1. To keep adjusting the tonal depths seem quite an endless task but very necessary.
2. A few small details depicted using white gouache will help with definition and contribute considerably to the overall effect. However, this should not be overdone.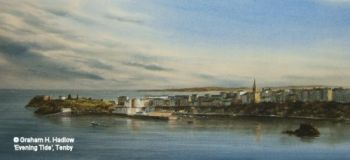
6.
1.The sea needs to be a darker tone towards the front. Wet the paper and apply horizontal strokes of blue/grey with a size 10 round brush ‘flattened out’. Add more paint as the paper begins to dry to impart some movement to the surface.
2. Before the sea area dries stroke in the reflections with a dry brush to render the edges soft before carefully lifting out any highlights.
3. After returning from a cup of tea stand back and look if there are any small details that the painting requires. If so carry on but do make sure that the brain is kept in gear!


 |
|  |
| 
Copyright © Graham H Hadlow Watercolours. All rights reserved.