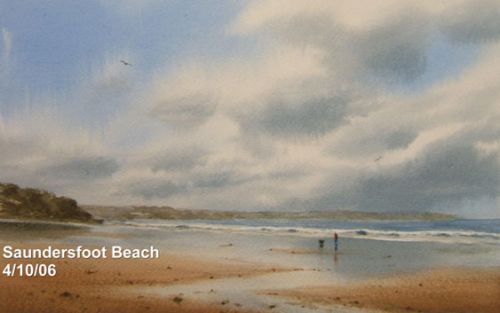
Stepped Demonstrations - Saundersfoot
5 Step demonstration of a watercolour paiting of Saundersfoot Beach, Pembrokeshire.
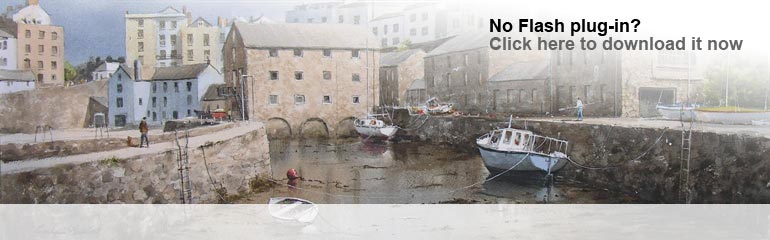
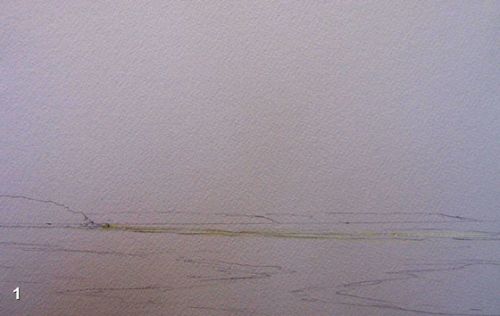
1. Arches 300gsm NOT surface cotton rag paper soaked for 30 mins. stapled to a Sundeala (school notice board material) board at 2” intervals and left to dry. This way the paper is stretched far tighter than using brown paper tape and works 100% of the time.
2. Image drawn out using HB clutch pencil and waves masked out using Winsor & Newton clear masking fluid applied with a clean dry brush to dry paper. (unlike with some other cheaper papers, I have never experienced any problems using Arches paper).
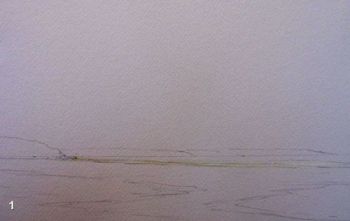
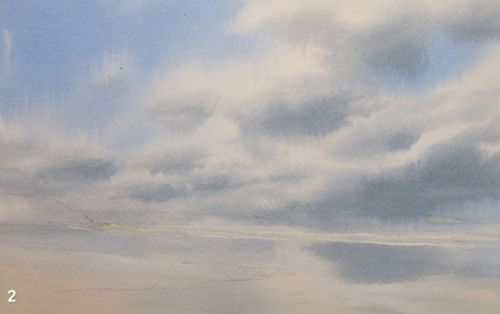
1. Wet the paper with clean water using a soft brush.
2. Using the stiff wash of cobalt blue, paint the gaps between the clouds. Allow the colour to be stronger at the top, getting weaker towards the horizon.
3. Using the stiff wash of cobalt and burnt sienna paint in the shadow areas underneath the white clouds. The clouds themselves appearing to become narrower the closer to the horizon.
4. Wash out a small hake brush and squeeze until almost dry. Using a circular motion, soften any hard edges which may have developed in the middle of each clouds. This will give them a rounded, three dimensional appearance.
5. Whilst the paper is still damp use the sky colours to suggest reflections in the wet sand employing vertical strokes with a size 8 round brush.

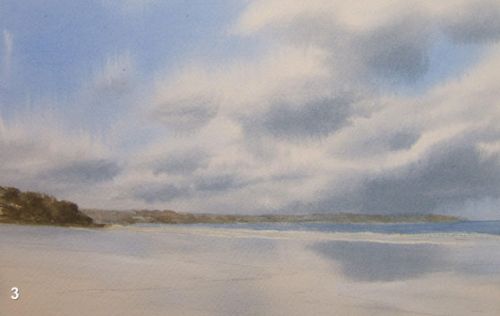
1. With a weak mixture of cobalt & burnt sienna with just a touch of raw sienna paint in the far cliffs and headland using a size 6 round brush. The brush hairs should be quite dry and slightly splayed out to deliver a soft hazy outline – this will give the required depth to the composition. Hard edges come forward & soft ones recede.
2. The nearer headland is painted using the same colours but a stronger mix, and the sea base wash using the cloud shadow colour with some cobalt added.
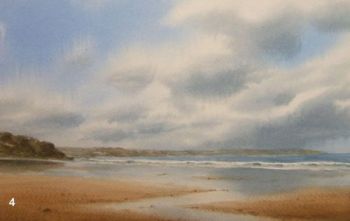
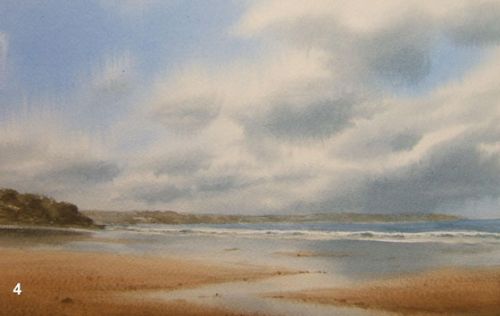
1.In order to achieve a soft transition between wet and dry sand, using a soft hake brush &clean water, wet the whole of the beach area. Paint in the areas of dry sand using a stiff mix of burnt sienna with a little added cobalt allowing the farther edges of the sand to be soft edged. If the far edges are painted hard edged they will appear like sand walls!
2. The reflection of the headland can be depicted using the same mix as for the headland itself with the tone diminishing the further down into the beach it goes (shadows go across the beach, but relections go straight down).
3. When the paper is dry rub off the masking fluid and, using the cloud shadow mix, suggest the darker parts of the breaking waves. I find that this is best done using a number 6 round brush with the hairs splayed out & employing very little water. This allows me to paint a series of soft edges. The tops of the waves can be softened using a small Winsor & Newton ‘University Series’ flat brush (the best I’ve encountered for ‘lifting out’). If waves are painted with too many hard edges they can look rather static.

1.To show movement on the sea, draw a dry brush(size 6 round) with cloud shadow mix, across the surface.
2. A few pebbles and bits of weed were added (getting smaller the further into the composition) and to give things a sense of scale I placed, off centre, a figure with a dog.
3. When adding figures I have found it better to start with the anorak rather than the head! If the head is applied too large, many painters with then compensate by making the body bigger (shades of Gulliver). The tiny head is dotted in last of all slightly forward.
4. The soft edged figure reflection is achieved by the application of quite dry paint and smudging down vertically with a clean finger. Try it on a scrap piece of paper first.
 |
|  |
| 
Copyright © Graham H Hadlow Watercolours. All rights reserved.